


Monday, October 25, 2010
Got to get away!!
Hey guys, I am on vacation this week in sunny Florida. You won't see much from me this week but I am thinking about blogging about my room, very pretty! Life's a beach! Laura


Sunday, October 17, 2010
Photo block tutorial
So I made these blocks for our youth at church and I promised I would come back and give you the details. I went to Loew's and purchased a hunk o' wood, actually it was a 2 x8 x8. I had the nice man at Loew's cut it into 7 inch chunks. I wanted them to be a square, or close to and it turns out a 2x8 isn't actually 8, it's 7 1/4, I didn't want to mess with the quarter so I started with a block that is 7 x 71/4. I sand all the edges and then put on a base coat of paint on. While that dries I start to prep my paper and designs I am going to add.
 I cut my paper 6 x 6 and then tear off a small bit on each side. Put Mod Podge on the wood and then on the back of your paper. I let it dry a minute and then run my brayer over the paper to get out any bubbles. Once it is dry I add 2 or 3 more layers. I use Mod Podge with a satin finish. I also put paper on both of the sides of the block. I cut it about 1 1/2 inches and then tear the edges again. I paint the bottom and put felt dots on it.
 On this one I drilled a hole in the top, centered and added a bit of glue and placed the cabinet door know in the whole. I also glued on the word family and a small clip with E6000 quick drying glue. It's hard to see in the picture but I took a gold ink pad and inked the edges and dabbed a bit of antique gold paint on the silver clip so that everything coordinates. It's a great way to display a picture. Of course my mind started thinking of all the possibilities so I got busy and made a couple for myself. Here is my Halloween design.
 I just love this, I love the combination of colors, and look at my kids, they are all grown up now so I love seeing pictures of them from Halloween past!
 Here is a side view, that is coordinating paper. The picture of the kids isn't attached. I simply clipped it on after I cut out circles to mount the picture on. The little "boo" on the bottom is something I had.
 I thought of this idea to add the ribbon but needed a handle and I didn't want to go and spend any money so I took a dowel I already had and drilled a hole in the long piece and down the center of the short pieces. I put a nail down the hole to hold everything together and added a bit of glue. Then I drilled a large hole in the block and put some glue in the whole and added the handle. Then I took scraps of ribbon and tied them onto the handle. It was really simple and so cheap!!! What a great Christmas idea!!! I made one more, a fall one.
 And the side view...
 As I said this idea is limitless. How cool would it be to make a birthday one and you bring it out whenever it's someone's birthday, add a personal note or what if you put affirmations on it, or "way to go" Great gift for a new baby.I thought about adding beads to the handle and use wire instead of a wood handle. Oh I almost forgot I had these earings and added them to the handle for extra interest. Good luck to you, if you make one, send me a picture!
~ toodles Laura~


~ toodles Laura~
Saturday, October 16, 2010
A twist on a picture frame!
Well I am going to be the first to say these aren't the best pics but I had to get them up today or it would be... well who knows when!!! Our youth at church are having an auction this weekend to raise bunches of money to do good things. I usually do a couple of floral arrangements but decided to do something new. Of course I am a last minute Joe or is it Jo, but here they are.
 I think it's pretty easy to figure out what I did, but I will try to post a tutorial this week.
 After I got these done, they inspired me to make some for me! Imagine... something I get to keep. So I am working on a fall and Halloween one. Oh in case you aren't sure what to do with them, simply clip a photo on or a "to do" list or how about something inspirational. That just gave me the best idea, what if you did a cute birthday one or ewww, things to be grateful for. Well as you can see the list is endless. I'll give you all the details and show you the ones I'm keeping soon!
~toodles~ Laura


~toodles~ Laura
I am being featured on!
Wow how exciting I am being featured on Tatertots and Jello and Sawdust and Paper Scraps today!!! I'm am so darn excited my kids are telling me to stop yelling!!! Grab their button on the right and go check out all the creative peoples out there! Happy Halloween and thanks ladies!
~toodles~ Laura
~toodles~ Laura
Friday, October 15, 2010
A is for Autumn!
I was born in the fall... and have great memories of celebrating my birthday in the cooler temps. Living in Texas we don't always get the "real deal" when it comes to fall so I have to kinda "fake it", and I am ok with that! These colors just make me happy, and feel warm and cozy, it is without a doubt my fav time of the year, (just in case you didn't know that!)
 This is one of my fav spots in my house. I don't have a mantel, that I decorate often, (we have one, but I consider that the "mans den" and so I don't change it out during the seasons, except Christmas) But this is my little space, I love everything about it and usually am sitting right in front of it when I am blogging, pitter patter, pitter patter!
 Look at my 2 new pumpkins. I bought these in July!!! Do you know how badly I wanted to put them out and show them to YOU??? It has been so difficult waiting! In hindsight I could have made the orange one with my Silhouette, but I didn't have it then, and well I just couldn't take it back.
 This is the other side of the table. I made this lamp, you can find out how to make your own here. Can you see my baby pumpkins in the background, love em!
Here is another look at the whole wall, notice how the space is filled nicely, there are different heights, different colors and textures.
 Check out the floor too, I did that years ago, about broke my back!
This room is an open kitchen and living area. Here is the other side.
 First I gotta show you my great garage sale find, I love this piece!!! The hardware is incredible, and I thought I was going to paint it, but I love it just like it is! Something wasn't right tho, not enough fall color, sure maybe above on the shelves but it needed more! hmmm put on the thinking cap!
 I had this picture that once hung on the wall and I thought hey what if....
 Yeah that will work, this font is from dafont, I think it's called Vanessa. It's just cut from paper, do you get where I am going here????
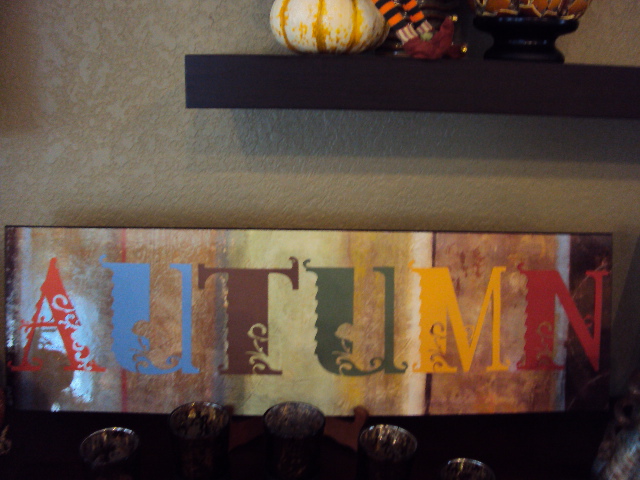 Yea, it's perfect, just what I needed! I just put it on with double stick tape. When I am done with fall I can take it off and hang it on the wall again! Let me pull back and show you the whole wall. Notice how the wall is filled again. So often I see people not using their spaces to it's full potential.
 This is a pretty big wall, and in this room it's the focal point. I had to fill it up! This has always been a challenge. I have never been able to find art that I really like for this wall, so I filled it up in other ways. Here take a closer look.
 Here is one shelf. Again, notice how I have mountains and valleys in my decorating, that is important, not everything should be at the same level and take up the same amount of visual space, for instance, the pumpkin plate is round and full, the birdcage is just the opposite.
 Here is the other side. These 2 pictures were the inspiration for the whole room, warning, warning... broken record! I just love them!!!!
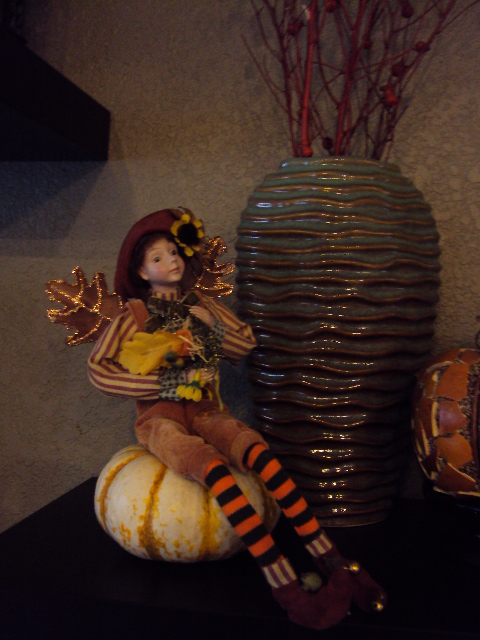
 Look at this sweet autumn fairy, isn't he adorable? You always see girl fairies, so anytime I see something like this as a boy, I gotta have it, since I have 3 boys myself! He is perched on top of a real pumpkin.
 I found this wooden thing at Goodwill, the one that the green pumpkin is sitting on. It is heavy, I have no idea what it is and no idea what I was going to do with it, but I really liked it and it had a great shape. It worked out nicely, giving the pumpkin a little more visual interest.
 Another look, I need to get off of the computer, and go work on the frames to replace the ones on the right corner! Isn't this dresser gorgeous!!! And check out all that storage!
 More fall happiness!!!
 Check this basket out, it looks like twigs, but it is plastic. Great find at First Monday Trade days. LOVE IT!!!
So that is about it for my fall decor, I have just a couple of things to do in the front yard. And once Halloween is over I will take down those few things and replace with some more fall stuff that isn't out yet and then I go from fall to Christmas, ooohhhh, don't even want to think about that yet! So tell me is your favorite season.... fall, and if so is your birthday in the fall too?
~toodles Laura~


Here is another look at the whole wall, notice how the space is filled nicely, there are different heights, different colors and textures.

This room is an open kitchen and living area. Here is the other side.


So that is about it for my fall decor, I have just a couple of things to do in the front yard. And once Halloween is over I will take down those few things and replace with some more fall stuff that isn't out yet and then I go from fall to Christmas, ooohhhh, don't even want to think about that yet! So tell me is your favorite season.... fall, and if so is your birthday in the fall too?
~toodles Laura~
Wednesday, October 13, 2010
More Halloween Decor!


I made this with a Goodwill frame and scrapbook paper for the background. The legs are made with my Silhouette. Have I mentioned how much I love it???? And once again, I have the best niece ever for buying it for me!


~toodles~ Laura
Saturday, October 9, 2010
Halloween... old and new!
Okay I suggest you get comfortable, get your favorite drink, empty your bladder whatever it takes. I am finally posting some Halloween/fall decor and ideas. It's my fav time of the year, (shock I know you haven't heard that from any other blogger!!!!) and so this is just the beginning. I have much more to show you over the coming days. Let me begin by showing your a really scary room...
 This is most of my fall stuff. I dump everything out of the bins and then begin figuring out where I will put it. It can be a bit overwhelming I suppose... but I am so excited to see it all, it's like opening a present!
This is a little Halloween tree that I made years ago. Pretty simple. The base is a heart, dowel drilled in and another cross dowel drilled to make the horizontal bar. I think I used a coat hanger to make the wire part up top. Take a closer look at some of the things hung on it. I love it ...but it doesn't really go with my decor now so I may have to Goodwill it.
 Simple wooden blocks that have a hole drilled thru them, rafia tied around it.
 Little round knob for a pumpkin and a spider made out of a pom pom and pipe cleaners.
 A wooden button and crepe wings make a little bat.
 A little ghost made out of some cheese cloth.
 Cute little face painted on the tree. I love this little tree! If you decide to make one use up some of your scraps, don't go and buy everything. I made this such a long time ago I don't even remember if it was a kit or I just used what I had.
 This is a fun little witch I made several years ago as well. It's just triangle with the top cut off a face shaped like a U and a little triangle hat and rafia for hair. It is stuffed like a pillow. I had several of them in different patterns all in a basket and even made some small ones to wear as a pin. My kids are all grown up now so I don't do much of Halloween but it's hard to let the old items go. Now for my current decor.
 This is my front porch. I showed you this same bakers rack decorated with beach items here. I love having this is gives me another space to decorate and it's just so inviting when I come up.
 Check out my lamp, I just bought that ribbon at a garage sale and knew just what I wanted to do with it. I can't decide if I want to add one more in the middle. What do you think? There is a tiny bit of sparkle in the ribbon, it's like woven jute, but it doesn't show up here.
 I love this little witch, another item I have had for years.
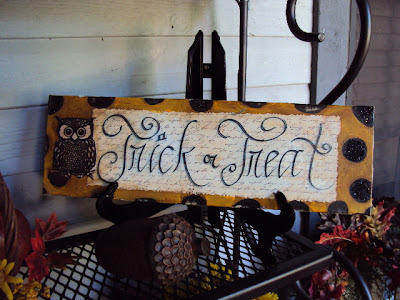 A dear friend game me this as a gift last year. Look how cute and simple. Simply a canvas, you could make whatever size you wanted. Scrapbook paper... painted around the edge, the black dots are black glitter and the owl is decoupaged also. I think the words are hand painted. I love this piece!!!
 I always try to add a touch of real flowers, especially these fall flowers, they last forever!
 This makes my heart pitter patter... the color combo.... yummy and check out the little owl peeking at me when I arrive home.
 Scarecrows! Another one of my fav's about fall. Here is another super easy cute idea. He has a 2x4 block as a body.
 Isn't he adorable???
 Ok I can't stop saying this but... I love this. It's burlap that has been painted. I could have made it myself but it was so inexpensive, half price at Hob Lob so I had to have it! Here is a little peek inside... I'll show you more in the coming days so be sure to stop by. If you make any of these items be sure to send me a pic. I would love to see what you do!
 Toodles ~ Laura
I'm linking to....
A Vision To Remember
Tatertots & Jello
Young & Crafty

This is a little Halloween tree that I made years ago. Pretty simple. The base is a heart, dowel drilled in and another cross dowel drilled to make the horizontal bar. I think I used a coat hanger to make the wire part up top. Take a closer look at some of the things hung on it. I love it ...but it doesn't really go with my decor now so I may have to Goodwill it.


I'm linking to....
A Vision To Remember
Tatertots & Jello
Young & Crafty
Subscribe to:
Posts (Atom)