Friday, April 30, 2010

Pretty in Pink.... not so much

So a friend posted this on her fb the other day (it wasn't hers just something she found on fb) and I fell in love with it instantly!!! I decided I had to have one, so today I went to garage sales and our Goodwill in search of a chair and wa~la I found one.  The style is a little different but I think I can make it work.


Isn't this terrible? I can't imagine having it in my house, but under that fabric is some goodness.  I can't wait to get started.  I went and picked up some chicken wire like stuff and I already have some burlap.  I'll post it when I get it done.  Unfortunately rain is predicted here so I don't know if I am going to get to it this weekend.
That is right another happy customer, can you believe I got this for 14.99, or that I paid 14.99 for it.  It has good bones and will look like a million bucks when I get thru.  At least that is what I told myself! ha It was a great day of buying second hand stuff.  I got this table, I can't find a thing wrong with it not even a scratch.

When I first saw it,  I thought I have no idea where I could put this, but it was only 25.00 and it was in such good shape and then I thought I could use it in my bedroom as a night stand, the one I have is dinky. So I loaded it up and brought it home.


Here it is all fixed up, still not sure if I am done arranging it.  Don't pay attention to the cords, I still need to fix those. It is a perfect fit and matches my furniture really well. This blue color is actually showing up much more baby blue than it is in the room, it looks more like a smoky blue when you are actually in there.  Anyway I have all kinds of great finds that I plan to show at a later date.  Tomorrow I am going to a HUGE flea market called First Monday Trade Days in Canton.  I hope to find some great finds there!

~Toodles Laura~

Thursday, April 29, 2010

Paper, paper, get your paper!

Paper is super cheap and there are endless things you can do with it.  These are pictures I hang in my sons room.  I took an old map and crumpled it up a couple of times and then took 2 canvases and modpodged the map(1 map cut into 2) onto the canvas.  Then I took some watered down acrylic paint and rubbed it over the map making it darker in some places than others.  I put one more final coat of modpodge on.  It has a really old look almost like leather.  It looks great in his travel theme room.

This is the kids bathroom.  This is kind of a funny angle, you are seeing the reflection in the mirror.  This is just tissue paper.  I used wallpaper paste to make it stay on and put a sealer coat over that.  I have had it in there for about 5 years and it has held up. I painted blue lines in the shape of a square as well. Below you can see where I got my inspiration. It sure wakes you up in the morn!  I'm actually ready for something a little more subdued.


You can find inspiration anywhere.  I was walking down the isle one day at Walmart and saw this bag and fell in love with it and immediately knew where I wanted to duplicate it.

This is a picture I made on the opposite wall, simple... made with scrapbook paper.

Another simple idea, cups I found for a dollar and covered with paper.  This gives me an opportunity to see the papers I love more often.

Nothing original here. I like to make cards with paper, but I had to show how I display them, and old shutter works perfectly!

I am making this for my church.  These are just wooden letters that I have modpodge with tissue.  Great idea for a kids room, you can do all kinds of things like this an old ginger jar lamp, letter's to their name, this method works on anything!!!


I got this at Marshall's, it's a tic tac toe board.  It suggest you put pictures in it but I wanted to use scrapbook papers, yet another opportunity to get to look at my favorite papers.  If you can't find one of these I think the same thing could be done with a big picture frame.  For the x & o's you could use buttons, or probably find wooden x & o's at the store. This sits on my coffee table, just adds a bit of whimsy to my room.

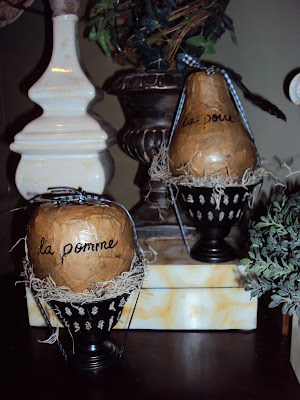
This is fruit I have had for a long time.  (Don't those nutty bars make you hungry?) I forgot to take a picture of what it looked like at first, just regular old fruit, nothing special. I wanted to make it look different so I thought I would crackle paint it, first I spray painted it with ORB and then put the crackle on and then off white acrylic.  I wasn't that excited about it and the sponge I used kinda fell apart as I was using it, so it really looked bad.  Luckily I was able to wash it off. As I was washing it, I dropped the apple and now it has a nice crack in it!  But no worries cover it up with paper!  I took a lunch sack and crumpled it up and tore pieces and started modpodging it all over the fruit, overlapping it and slathering  it with more modge podge.  I love the look of this, so cheap and now it looks like leather.  I wrote the french word for the piece of fruit on it and stuck it on top these cute little containers I got from the dollar store, wrapped a black and white checkered ribbon around it and wa~la there you have something for nothing!  Side note... I got this topiary at a garage sale last weekend for $2.00, so cheap, but fabulous!!!
Here is the final vignette.  I thought I was giving these away, but I might need to keep them for myself!

Up close and personal...

Come a little closer... actually I don't care for my handwriting but no worries when I go to my niece's house she has one of those new fancy machines that cuts out lettering so I'll just cover up what I have done and add her fancy letters! So find something in your house that needs a little papering, (besides the cat box)and show me what you come up with!

~toodles~ Laura

Yard Art

This is the fireplace screen that I promised I would show you a couple of days ago.  I purchased it at Goodwill for 7.99.  I love oak leaves so I had to have it but didn't need a fireplace screen. I spray painted it with hammered copper paint and hung a plant holder in front of it.  I also took the legs off of it and hung it on the fence.  There is a vine that will grow up it eventually, I can't wait.  This is what I see out my kitchen window. Dreamy!!!

Tuesday, April 27, 2010

Hey guys go check out www.thestoriesofa2z.com and see all the great vignette's.  It's a new blog I found with lots of great ideas.

Saturday, April 24, 2010

Which way is the beach?


So I have had this shelf for YEARS and it has been in almost every room in my house as it has lost it's popularity it ended up on the back porch holding plants.  And then I found out about ORB spray paint (oil based bronze) and once again it has been brought back to life. It looked so good I moved it to my front porch.  The truth is not much inside my house needs decorating so I have to do the front porch! :)

I love how it turned out.  I didn't buy anything recently but the plants.  I keep a closet of things I like and find cheap, so that I can switch things up.  (Feeling a little wasteful when I actually say that out loud!) Anyway I went to Florida a couple of months ago and helped my friend Karen do a little decorating with her house, (love you girl) and I have had the beach bug ever since, so once I decided to bring this to my front porch I knew just what theme I wanted to use to decorate with.

Here is a closeup. I love the shell balls I got at TJ Home store a couple of years ago, they are perfect, make me happy, the second one is gorg, but doesn't show that well.

Close up of bottom half.  All the seashells and beach wood and rocks were gathered on various vacations last year.  I was very fortunate to get to go to 3 different beaches around the US last year.


I love this moss stuff, Hob Lob, plastic but looks like the real thing. I hope the birds leave it alone!

This jar is full of sand and shells from our vacation to Padre, great times. And those gloves are gloves my son used to wear when he was a little boy working in the yard. <3

I am loving succulents all of the sudden. This one looks like it is reaching out to me. I'm not sure they will be happy on the porch, if not I know where to buy some fake ones! :)


This little birdie told me it needed a new home. By the way part of this project was taking down a big shrub that blocked our front porch.  I found a robins nest in there with 3 little eggs in it.  I'm feeling so sad that I took the babies from her.  I left it in the bush next to the one I took down, but she has not returned.  I didn't know I was taking her home. Bird sadness. :(


Can you believe this planter is from Walmart, I want more, more, more. So pretty. So here is my challenge.  Take a look around your house at one spot you want to decorate.  Think about what you would like it to look like. If you have no idea go and grab stuff you aren't using or grab some of your favs.  Go from room to room and just take one things. Put together a color pallete that you like, group things together that are similar in style and see if you have enough for your space.  I took way more outside than I needed, tried to see what I had the most of to tell my story.  Put things you love together and you will love the finished product!!  Look for different shapes, sizes and textures and make sure you have things that are tall, short and everything in between. Have fun!!! If you don't like it, start all over again, it isn't permanent.


Here is my next redo.  I got it at Goodwill for $7.99. I hope to work on it tomorrow!

Friday, April 23, 2010

Give me an S!

So I found this frame at our church's rummage sale for $1.00.  I wish you could see the detail in it.  It is so pretty, I think it is very old. I didn't have any idea what I was going to do with it but I knew I had to have it.


I don't think you can tell from the first picture but the glass is like a dome or a bubble, very cool!

Don't pay attention to the dirt, just trying to get a picture so that you can see the bubble.

I finally decided what I was going to do, frame some fabric, but didn't know what else I could do besides that. I found this remnant, perfect for my house decor. I went to Hob Lob, the world's greatest store!!!!  I looked around for something to add to the inside, saw lots of possibilities and thought of some things I could use at home and so I didn't buy anything. I decided to come home and play with it.

But first I had to clean the glass.  Is this what they mean by no pain no gain? This was one of the most time consuming parts of the project.  I couldn't get it to stop bleeding!


I painted the frame with spray paint, Oil Rubbed Bronze, love that stuff, but I added a little bit of Dazzling Metalics, Rich Espresso by DecoArt to give some definition to the frame. I just lightly rubbed it on with an old t-shirt.


I wasn't happy with anything I had at home, but I got an idea and ran back to the store to get exactly what I needed to put in the center.


I am so happy how this turned out, I just LOVe it!  I am going to hang it in my entry hallway.  I love how even tho it's an old piece it looks fresh and new and I think the "S" I picked out is a little more modern.  I painted it with Oil Rubbed Bronze also. The colors aren't quite showing up here, there is a bit of a camel color, a little more yellow than is showing in the picture.  Anyway here is a sneak peak at my next project, I hope to get it done this weekend. This blogging stuff is good for my "to do" list. 


Thursday, April 22, 2010

A Favorite Space!

Do you have a space in your house that you LOVe, LOVe, LOVe?  Does that place make you happy inside everytime you pass it by? I have a space in my great room, my buffet.  I just LOVe it, I LOVe the piece of furniture, I LOVe the picture above it.  I LOVe that even if that is the only thing that I decorate I feel like the whole room is done. This is what it looks like right now. Thinking I may change it up to beach stuff for the summer.


I loved how this turned out for Valentine's day and it was so simple. The hearts were so really easy.  I purchased wooden hearts and covered them with scrapbook papers.  Some I textured, I added ink to the edges.  I did the same thing with the XOXO and mounted that on a small photo album.  The one thing that inspired me was the chocolate candy candles.  They smelled like the real thing and I knew I had to have them and make a Valentine table. The teapot doesn't show well but it's a love letter.  I LOVe it!


I was so happy how this turned out.  I simply purchased letters at HobLob and hung them on the wall and framed them up.  (Now I have a frame I am not using, I hope you share my plan with that soon.) You can't see it very well but there is the cutest little elf sitting on a glass block. I'm always trying to think of ways to bring my walls into Christmas decorating, this was the perfect solution.


This picture turned out awful, this was before I got my new camera.  Fall is my favorite season.  Here in Texas we don't always see alot of fall trees so I have to create it in my house.  I love the combination of blue and rust colors.

 One thing that makes this whole process easy is having a good stock of basic items that you can use over and over in different ways. Most of these items are used other places in my house.  I simply gather up what would work for the table I am trying to create.  I also have a small closet I leave alot of these items in so that I can grab them up quickly and make a table scape.

So I hope you have a place that you LOVe, that makes you happy, if not go around your house and gather up a bunch of stuff and start playing!

Monday, April 19, 2010

This little light of mine, I'm gonna let it shine!

You may have noticed this lamp in the pics I posted yesterday.  I have a thing for vases and can only have so many of them in my house, particularly blue/green vases.  I also have a hard time finding lamps that I like.... do you get where I am going?  I decided to turn this inexpensive vase into a lamp.  I buy these at Ross and Marshall's for $6-10 bucs.  You can't beat that.  You'll need to purchase a lamp kit at your local hardware store.  I got mine at Home Depot for $9.97, depending on your shade, you'll also need a harp( not the musical instrument, it's the thingy that holds the shade on). Make sure you get the right size, it should not be longer than your shade. They cost about 4.00. Don't you love the shade, I picked it up at a garage sale this weekend for $1.00!!!

This vase is gergeous, I couldn't decide on this one or white, love them both!

The directions on how to put the lamp together are on the back of the package.  It's very simple and only takes a 5 minutes to put together.  Don't be intimidated, truly simple! Typically I drill a hole in the lamp base.  One thing to consider it how thick the lamp base is.  Alot of times they are too thick to drill through, if so I will drill in the back of the vase about an inch up from the bottom.  If the vase is bottom heavy you can bet you'll never get through.  I use a bit that can go through ceramics.  I think it's called a diamond drill bit. This second lamp I made had a design that had holes all in it so I didn't have to drill.  If you have to drill be patient this is the part that takes the longest.  I have memories of Shawshank Redemption when I am drilling, felling like I am never gonna get done, but you will, just keep on.  I also put a little water on the ceramic to keep it from cracking. Your kit will come with 3 different sizes of plugs, the hole in your vase can't be bigger than the plugs or it won't work.

This is a very important tip, make sure you put the bottom part of the harp on before you get the whole thing put together.  This is the thing that lets you attach a lampshade. I had to redo mine. Also if one of the plugs doesn't fit, just get the one that is closest and wrap tape around it until if fits.

It works!!!! I love this one of a kind lamp.  You will become the vase hoarder that I am, try it and send me pics of what you do!

Sunday, April 18, 2010


Well here it is my first blog! I have been following blogs for the last few months and LOVe them!!! In fact I spend way too much time reading and seeing what everyone else is doing and not enough time creatin'! This whole idea of sharing and getting to see what people do all over the country is just fascinating to me! So I am going to throw my hat in and see if I can manage to keep up with this among my other task.

I'll will share that I have been really inspired by many bloggers and have gotten back into garage sales and thrift shops. I'll post some of the recent things that I have purchased and then show you what I end up doing with them in future post but for now here are a few pics of my house. You'll have to be patient with me, I can't figure out how to get the pics below the post and put a comment. I'll learn!


Related Posts Plugin for WordPress, Blogger...