So I made these blocks for our youth at church and I promised I would come back and give you the details. I went to Loew's and purchased a hunk o' wood, actually it was a 2 x8 x8. I had the nice man at Loew's cut it into 7 inch chunks. I wanted them to be a square, or close to and it turns out a 2x8 isn't actually 8, it's 7 1/4, I didn't want to mess with the quarter so I started with a block that is 7 x 71/4. I sand all the edges and then put on a base coat of paint on. While that dries I start to prep my paper and designs I am going to add.
I cut my paper 6 x 6 and then tear off a small bit on each side. Put Mod Podge on the wood and then on the back of your paper. I let it dry a minute and then run my brayer over the paper to get out any bubbles. Once it is dry I add 2 or 3 more layers. I use Mod Podge with a satin finish. I also put paper on both of the sides of the block. I cut it about 1 1/2 inches and then tear the edges again. I paint the bottom and put felt dots on it.
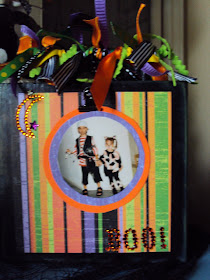
On this one I drilled a hole in the top, centered and added a bit of glue and placed the cabinet door know in the whole. I also glued on the word family and a small clip with E6000 quick drying glue. It's hard to see in the picture but I took a gold ink pad and inked the edges and dabbed a bit of antique gold paint on the silver clip so that everything coordinates. It's a great way to display a picture. Of course my mind started thinking of all the possibilities so I got busy and made a couple for myself. Here is my Halloween design.
I just love this, I love the combination of colors, and look at my kids, they are all grown up now so I love seeing pictures of them from Halloween past!
Here is a side view, that is coordinating paper. The picture of the kids isn't attached. I simply clipped it on after I cut out circles to mount the picture on. The little "boo" on the bottom is something I had.
I thought of this idea to add the ribbon but needed a handle and I didn't want to go and spend any money so I took a dowel I already had and drilled a hole in the long piece and down the center of the short pieces. I put a nail down the hole to hold everything together and added a bit of glue. Then I drilled a large hole in the block and put some glue in the whole and added the handle. Then I took scraps of ribbon and tied them onto the handle. It was really simple and so cheap!!! What a great Christmas idea!!! I made one more, a fall one.
And the side view...
As I said this idea is limitless. How cool would it be to make a birthday one and you bring it out whenever it's someone's birthday, add a personal note or what if you put affirmations on it, or "way to go" Great gift for a new baby.I thought about adding beads to the handle and use wire instead of a wood handle. Oh I almost forgot I had these earings and added them to the handle for extra interest. Good luck to you, if you make one, send me a picture!
~ toodles Laura~


Very cool! Love how yours turned out.
ReplyDeleteI love these so cute!Thanks for linking up to A Crafty Creative Christmas Link up!
ReplyDeleteHeather